Machining titanium is one of those topics that can feel simple on paper and stubborn in reality. Titanium alloys are famously strong for their weight, highly corrosion resistant, and widely used in aerospace, medical, motorsport, and demanding industrial environments. But those same advantages bring challenges at the machine: heat builds up, tools wear quickly if you’re not careful, and thin sections can move or chatter at the worst possible moment.
This guide breaks down what matters most when Machining titanium: alloy selection, tooling, speeds and feeds, workholding, coolant strategy, inspection, and the common failure modes that drive scrap and rework. If you’re sourcing titanium components, it’ll also help you ask better questions during quoting and DFM so lead times and costs stay predictable.
Machining Titanium Basics: Why it Behaves Differently
When Machining titanium, the biggest difference versus steels or aluminium is how titanium handles heat and stress at the cutting edge. Titanium has relatively low thermal conductivity, meaning heat doesn’t travel away through the chip as readily. Instead, much of it stays concentrated near the tool tip and in the workpiece surface layer. That creates a tight process window: push too hard or let the tool rub, and you can generate high temperatures that accelerate wear and degrade surface integrity.
Titanium also has a tendency to “spring” slightly due to its strength and elasticity, especially on thin walls. That can lead to rubbing, chatter, and dimensional drift if the setup isn’t rigid and the toolpath is not well supported. The good news is that with the right planning, titanium machining can be repeatable and efficient, just less forgiving of shortcuts.
- Low thermal conductivity concentrates heat at the tool tip
- High strength maintains cutting forces even at elevated temperatures
- Elasticity can cause spring-back, affecting tolerance and finish
- Tool rubbing is a fast route to work hardening and rapid wear
Titanium Alloy Selection: Grade 2 vs Ti-6Al-4V
Titanium isn’t a single material. Choosing the right alloy for function and manufacturability is a major lever in both cost and lead time. Commercially pure grades (like Grade 2) are generally more formable and can be more forgiving to machine, while alpha-beta alloys like Ti-6Al-4V (Grade 5) are the workhorse for aerospace and high-strength applications but are more demanding at the tool.
In procurement terms, it’s worth aligning the alloy spec with the actual requirement: corrosion resistance, strength-to-weight, temperature capability, fatigue, or biocompatibility. Over-specifying can increase machining time, tool consumption, and inspection complexity without improving the part’s performance.
- Grade 2 (CP titanium): strong corrosion resistance, comparatively easier cutting
- Grade 5 (Ti-6Al-4V): high strength, common in aerospace, more tool wear risk
- Grade 23 (ELI Ti-6Al-4V): medical/implant use, tighter controls, similar machining traits
- Consider availability and mill form (plate, bar, billet) to avoid long material lead times
Cutting Tools for Machining Titanium: Carbide, Coatings and Geometry
Tooling choices can make or break Machining titanium. Carbide is common for milling and drilling titanium, but the grade, coating, and geometry need to suit the heat and cutting forces involved. Coatings like AlTiN/TiAlN are widely used because they maintain hardness at higher temperatures, but the real win often comes from geometry and edge prep: sharp enough to cut cleanly, robust enough to resist chipping, and designed to evacuate chips efficiently.
A frequent mistake is using a tool intended for steel and trying to “slow it down” for titanium. Titanium benefits from tools designed for high-temperature edges, stable chip formation, and controlled engagement. For complex 5-axis machining work, shorter gauge lengths and variable helix/variable pitch can reduce chatter significantly.
- Choose carbide grades designed for heat and notch wear resistance
- Prefer geometries that reduce radial cutting forces and improve chip flow
- Variable helix/pitch tools can reduce chatter on thin walls
- Keep tool overhang short; rigidity is often more valuable than raw spindle power
Speeds and Feeds for Titanium Machining
With Machining titanium, success usually comes from consistent tool engagement and avoiding rubbing. Very low surface speeds are common compared with aluminium, but that doesn’t mean the process should be timid. The goal is to maintain chip thickness and keep the cut “clean,” using appropriate feed per tooth and toolpaths that avoid burying the cutter.
Modern CAM strategies – high-efficiency milling (HEM), adaptive clearing, trochoidal paths – often outperform traditional slotting because they control engagement and reduce heat spikes. You’re aiming for steady heat generation, not peaks that destroy edges.
- Use toolpaths that keep engagement angle consistent (adaptive/HEM)
- Avoid full-width slotting when possible; stepovers help control heat
- Watch for rubbing: too low a feed can be worse than slightly higher feed
- Plan roughing and finishing separately to protect surface integrity
Workholding and Rigidity: The Hidden Driver of Titanium Machining Quality
If you want predictable outcomes when Machining titanium, workholding is non-negotiable. Titanium’s cutting forces and tendency to vibrate mean that even minor compliance in fixtures, soft jaws, or part location can show up as chatter marks, tapered features, or mismatched datums between ops.
A practical approach is to design setups around stable datums, limit stick-out, and support thin features as early as possible. For plate parts, that might mean using sacrificial fixtures or vacuum systems carefully validated for rigidity. For prismatic CNC components, custom soft jaws with good wrap and support, plus conservative jaw pressure to prevent distortion, typically pay back quickly.
- Fixture to functional datums and keep datum scheme consistent across ops
- Support thin walls and long overhangs early in the process plan
- Minimise tool stick-out and part stick-out wherever possible
- Validate clamping forces so the part is held firmly without distortion
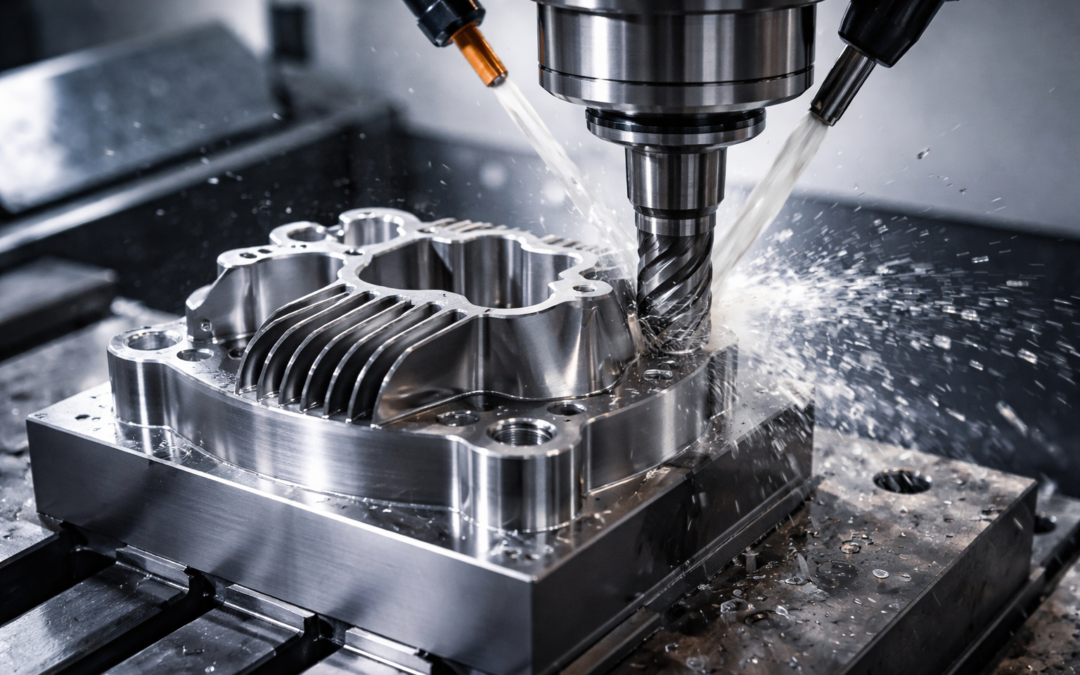
Coolant and Chip Control in Machining Titanium
Because titanium traps heat near the cutting zone, coolant strategy matters. Flood coolant can work well in many cases, but delivery is everything: you need coolant reaching the tool tip and chip evacuation area consistently. Through-spindle coolant is often a strong advantage in drilling and deep pocket milling. Air blast and MQL can be used in certain scenarios, but they must be matched to the operation and tool coating to avoid overheating.
Chip control is equally critical. Titanium chips can be stringy and can re-cut easily, which damages the tool and can mar surfaces. Toolpaths that encourage chip breaking, plus effective evacuation, reduce both tool wear and cosmetic defects.
- Ensure coolant reaches the cutting edge consistently (not just “somewhere near”)
- Through-spindle coolant helps drilling, deep features, and chip evacuation
- Prevent chip re-cutting with good evacuation and sensible toolpath direction
- Monitor for built-up edge and notch wear at the depth-of-cut line
Drilling Titanium: Avoiding Work Hardening, Heat and Broken Drills
Drilling is a common pain point in Machining titanium because the tool is surrounded, heat is trapped, and chip evacuation is harder. Peck strategies and through-coolant drills can improve reliability, but the key is avoiding dwell and ensuring chips clear. A tiny dwell at the bottom of a hole can spike heat and cause rubbing, which accelerates wear or causes the drill to seize.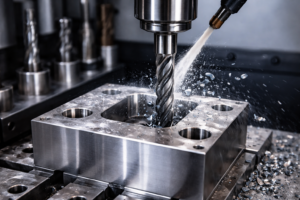
If you have to hold tight positional tolerances or surface finish inside holes, it’s often better to drill undersize and follow with a reamer or boring operation designed for titanium. That can be more consistent than trying to hit everything in one drilling step.
- Avoid dwell at the bottom of holes; keep the drill cutting
- Use through-coolant drills where possible for heat and chip control
- Consider drill-then-bore/ream for tight tolerance and finish requirements
- Validate holemaking sequences for burr control on exit
Milling Titanium Parts: Roughing, Finishing and Surface Integrity
In milling, Machining titanium is largely about separating roughing from finishing and protecting the final surfaces from heat and stress. Roughing should remove material efficiently while controlling engagement and avoiding chatter. Finishing then uses stable tool engagement and light, consistent passes to hit tolerance and surface finish.
Surface integrity matters in titanium, especially for fatigue-critical parts. Overheating can affect the near-surface microstructure and can introduce tensile residual stresses. Even when parts “measure OK,” poor surface integrity can reduce performance. That’s why a controlled process – sharp tools, stable engagement, good coolant, and sensible finishing parameters – is important.
- Rough with engagement-controlled toolpaths to limit heat spikes
- Leave consistent stock for finishing; uneven stock makes finishing unstable
- Use dedicated finishing tools and avoid worn roughing tools on final surfaces
- For fatigue-critical parts, prioritise surface integrity over cycle time
5-axis Titanium Machining: Fewer Setups, Higher Discipline
5-axis can be a big advantage for Machining titanium, particularly for aerospace-style geometries, complex pockets, and parts with multiple faces. Reducing setups helps maintain datum consistency and can improve overall accuracy. However, 5-axis also increases the need for collision-safe toolpaths, controlled tool lengths, and stable workholding because tool engagement varies with orientation.
A good 5-axis strategy often includes careful tool selection for reach vs rigidity, plus CAM verification and probing routines that catch part movement early. Many shops, Tarvin Precision included, tend to treat 5-axis titanium as a process engineering exercise rather than a “run it like aluminium” job, because the cost of an avoidable crash or scrap part is higher.
- Use 5-axis to reduce setups and maintain datums, not just to “make it fit”
- Prioritise short, rigid tools and verify clearance in CAM simulation
- Add probing/checks to confirm datums before critical finishing operations
- Manage tool engagement changes caused by tilting and complex surfaces
Tolerances, GD&T and Inspection for Titanium Components
Titanium parts often come with tighter tolerances and more GD&T because they’re used in high-performance assemblies. But tight tolerances don’t exist in isolation, they influence toolpaths, workholding, inspection approach, and cycle time. A simple DFM step is to identify which features truly need tight control and which can be opened up slightly without affecting function.
For inspection, titanium’s reflective surface and complex geometry can make measurement more challenging. In-process probing can help control drift across multiple operations, while CMM inspection and suitable datum strategy confirm final compliance. It’s also worth thinking about how a feature will be measured when you specify it – especially for deep pockets, thin walls, or blended surfaces.
- Mark critical characteristics and avoid “tight everywhere” drawings
- Confirm datum scheme supports real-world inspection access
- Use in-process probing to control drift between ops
- Plan measurement method for hard-to-reach features before release
Common Problems Machining Titanium and How to Prevent Them
Most problems in Machining titanium cluster around heat, rigidity, and chip management. If you see rapid tool wear, chipping, or poor finish, it’s usually a sign of rubbing, unstable engagement, or chips being re-cut. Dimensional issues often trace back to part movement, inconsistent stock, or thermal effects across long cycles.
Rather than “tweaking feeds” endlessly, it’s often faster to address the root cause: change the toolpath, reduce tool overhang, add support, improve coolant delivery, or alter the sequence so thin features are finished last.
- Notch wear at depth line: reduce heat spikes, adjust axial DOC strategy
- Chatter on thin walls: add support, use variable pitch tools, refine toolpath
- Built-up edge / rubbing: increase feed to maintain chip thickness, sharpen tool strategy
- Dimensional drift: verify workholding, probe datums, manage heat across long cycles
Designing for Machining Titanium
If you can influence design, small changes can make Machining titanium significantly easier. Avoid unnecessarily deep pockets with tiny internal radii, reduce extreme aspect ratios, and consider how the part will be fixtured and measured. Even adding a temporary tab or sacrificial boss can stabilise a part during machining and be removed later.
For threaded holes, specify thread forms and depths that are practical to produce and inspect. For thin walls, define minimum thickness based on function, but also consider adding ribs or fillets that improve stiffness without much mass increase – often a win in titanium.
- Avoid deep, narrow pockets; open up geometry where function allows
- Use generous internal radii to enable stronger tools and better finish
- Add stabilising features (tabs/bosses) if they can be removed post-machining
- Specify threads and finishes with manufacturing and inspection in mind
Sourcing Machining Titanium: What to Include in an RFQ
If you’re buying titanium parts, the RFQ content can directly determine how accurate the quote is and how smoothly the job runs. Include the drawing revision, material spec and form, finish requirements, certification needs, and any special process requirements (like NDT or heat treatment). If the part is for aerospace or other regulated sectors, clarify traceability expectations up front.
Shops like Tarvin Precision typically appreciate receiving the “why” behind the tightest requirements (e.g., which surfaces are functional, which are cosmetic), because that allows a process plan that protects the critical features without over-processing everything else.
- Drawing + 3D model (if available), with revision clearly stated
- Material spec (e.g., Grade 5) and required certs/traceability
- Critical dimensions and GD&T highlighted
- Finish requirements (Ra, bead blast, anodise, etc.) and cosmetic expectations
- Quantity, delivery dates, and whether prototypes may evolve into production
FAQ: Machining Titanium
Is machining titanium always expensive?
It tends to cost more than aluminium or mild steel due to slower cutting speeds, higher tool wear, and more cautious process control. But good DFM and stable toolpaths can reduce time and scrap, which is where the biggest savings usually come from.
What’s the most common cause of tool failure in titanium?
Heat and rubbing at the cutting edge, often caused by unstable engagement, insufficient coolant at the tool tip, or excessive tool overhang. Chip re-cutting is another frequent contributor.
Can you get a good surface finish on titanium parts?
Yes, but finishing needs discipline: consistent stock allowance, sharp finishing tools, stable workholding, and parameters that avoid smearing or chatter. The finishing strategy matters as much as the machine.
Is 5-axis better for machining titanium?
Often, because it can reduce setups and keep datums consistent. But it needs careful programming and rigidity management because tool engagement can change with orientation.
Repeatable Titanium Machining Comes from Process Control
Machining titanium is rarely about a single “magic” speed or tool. It’s about stacking the basics: choose the right alloy, use tooling designed for titanium, keep engagement stable, make rigidity a priority, deliver coolant effectively, and separate roughing from finishing. Do that consistently and titanium becomes a predictable material – still demanding, but not mysterious.
Whether you’re making a one-off prototype or scaling to production, the best results usually come from early DFM and clear RFQ information. That’s also where experienced precision suppliers, Tarvin Precision included, tend to add the most value in a non-salesy way: flagging risk areas early so you avoid surprises later.